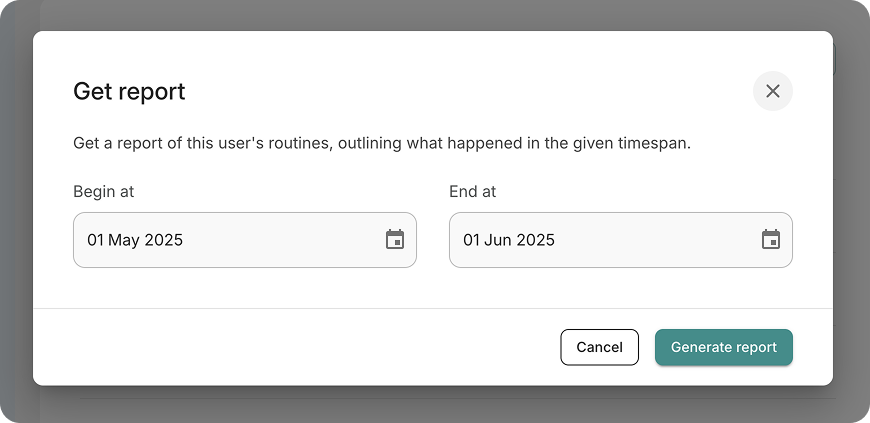
A client's week is built around appointments: the morning care round, a visit from the GP,
physiotherapy, the grandchildren coming by after school. Until now those appointments were kept in
different places. With this release they come together in one calendar. The client sees it on the
Genus, family members use it in the Genus app, and care professionals manage it in the Community
Portal.
What's new
- Family members can open the client's calendar in the Genus app, see what is planned and add
their own appointments.
- Care professionals see everything planned for a client in one calendar in the Community Portal,
including appointments added by family. Colours show where each appointment comes from.
- Care organisations get a new privacy setting that hides the details of their appointments from
family members.
- Clients can browse forward in My Day on the Genus to see what is coming up tomorrow and later in
the week.
For family members: the calendar in the Genus app
Open your loved one's Genus in the app and tap Calendar. The calendar opens on today. Swipe through the row of dates, or tap the calendar icon at the top right to jump to any day.
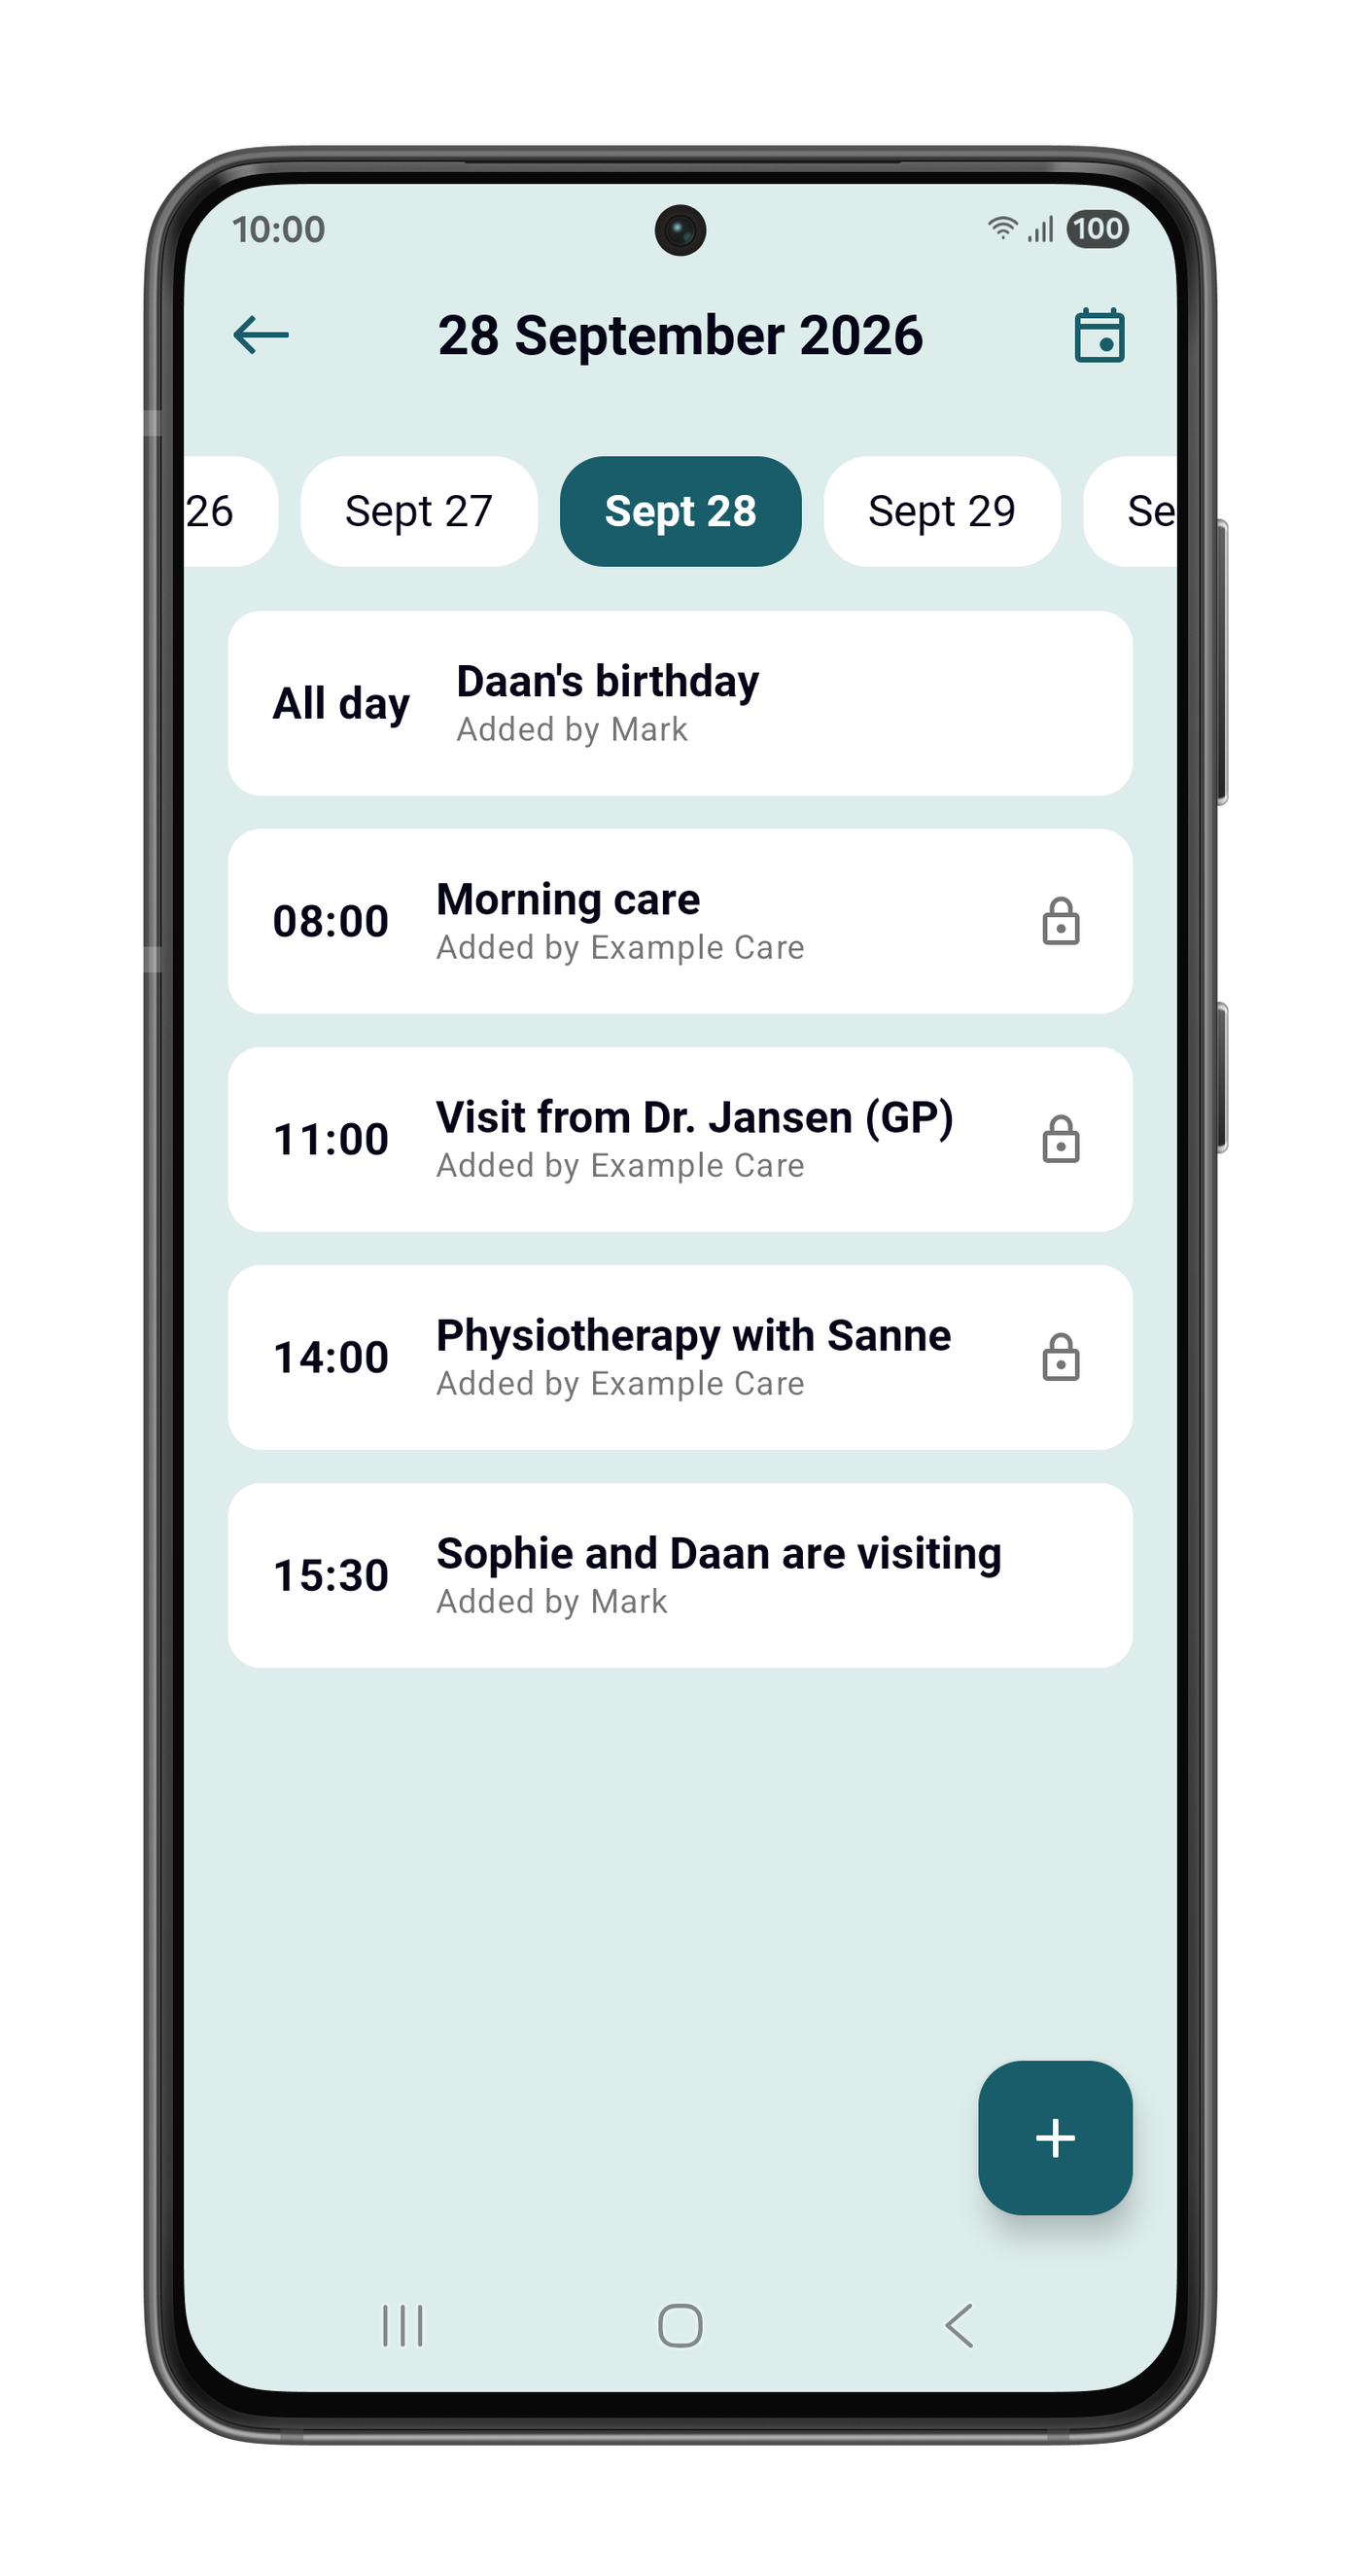
Each appointment shows its time, or All day, and who added it. Appointments from the care organisation show its name, for example Added by Example Care, so you can see at a glance what the care team planned and what the family planned. This includes appointments the care organisation plans in its own care system.
A lock marks an appointment you can't change in the app, such as one planned by the care organisation.
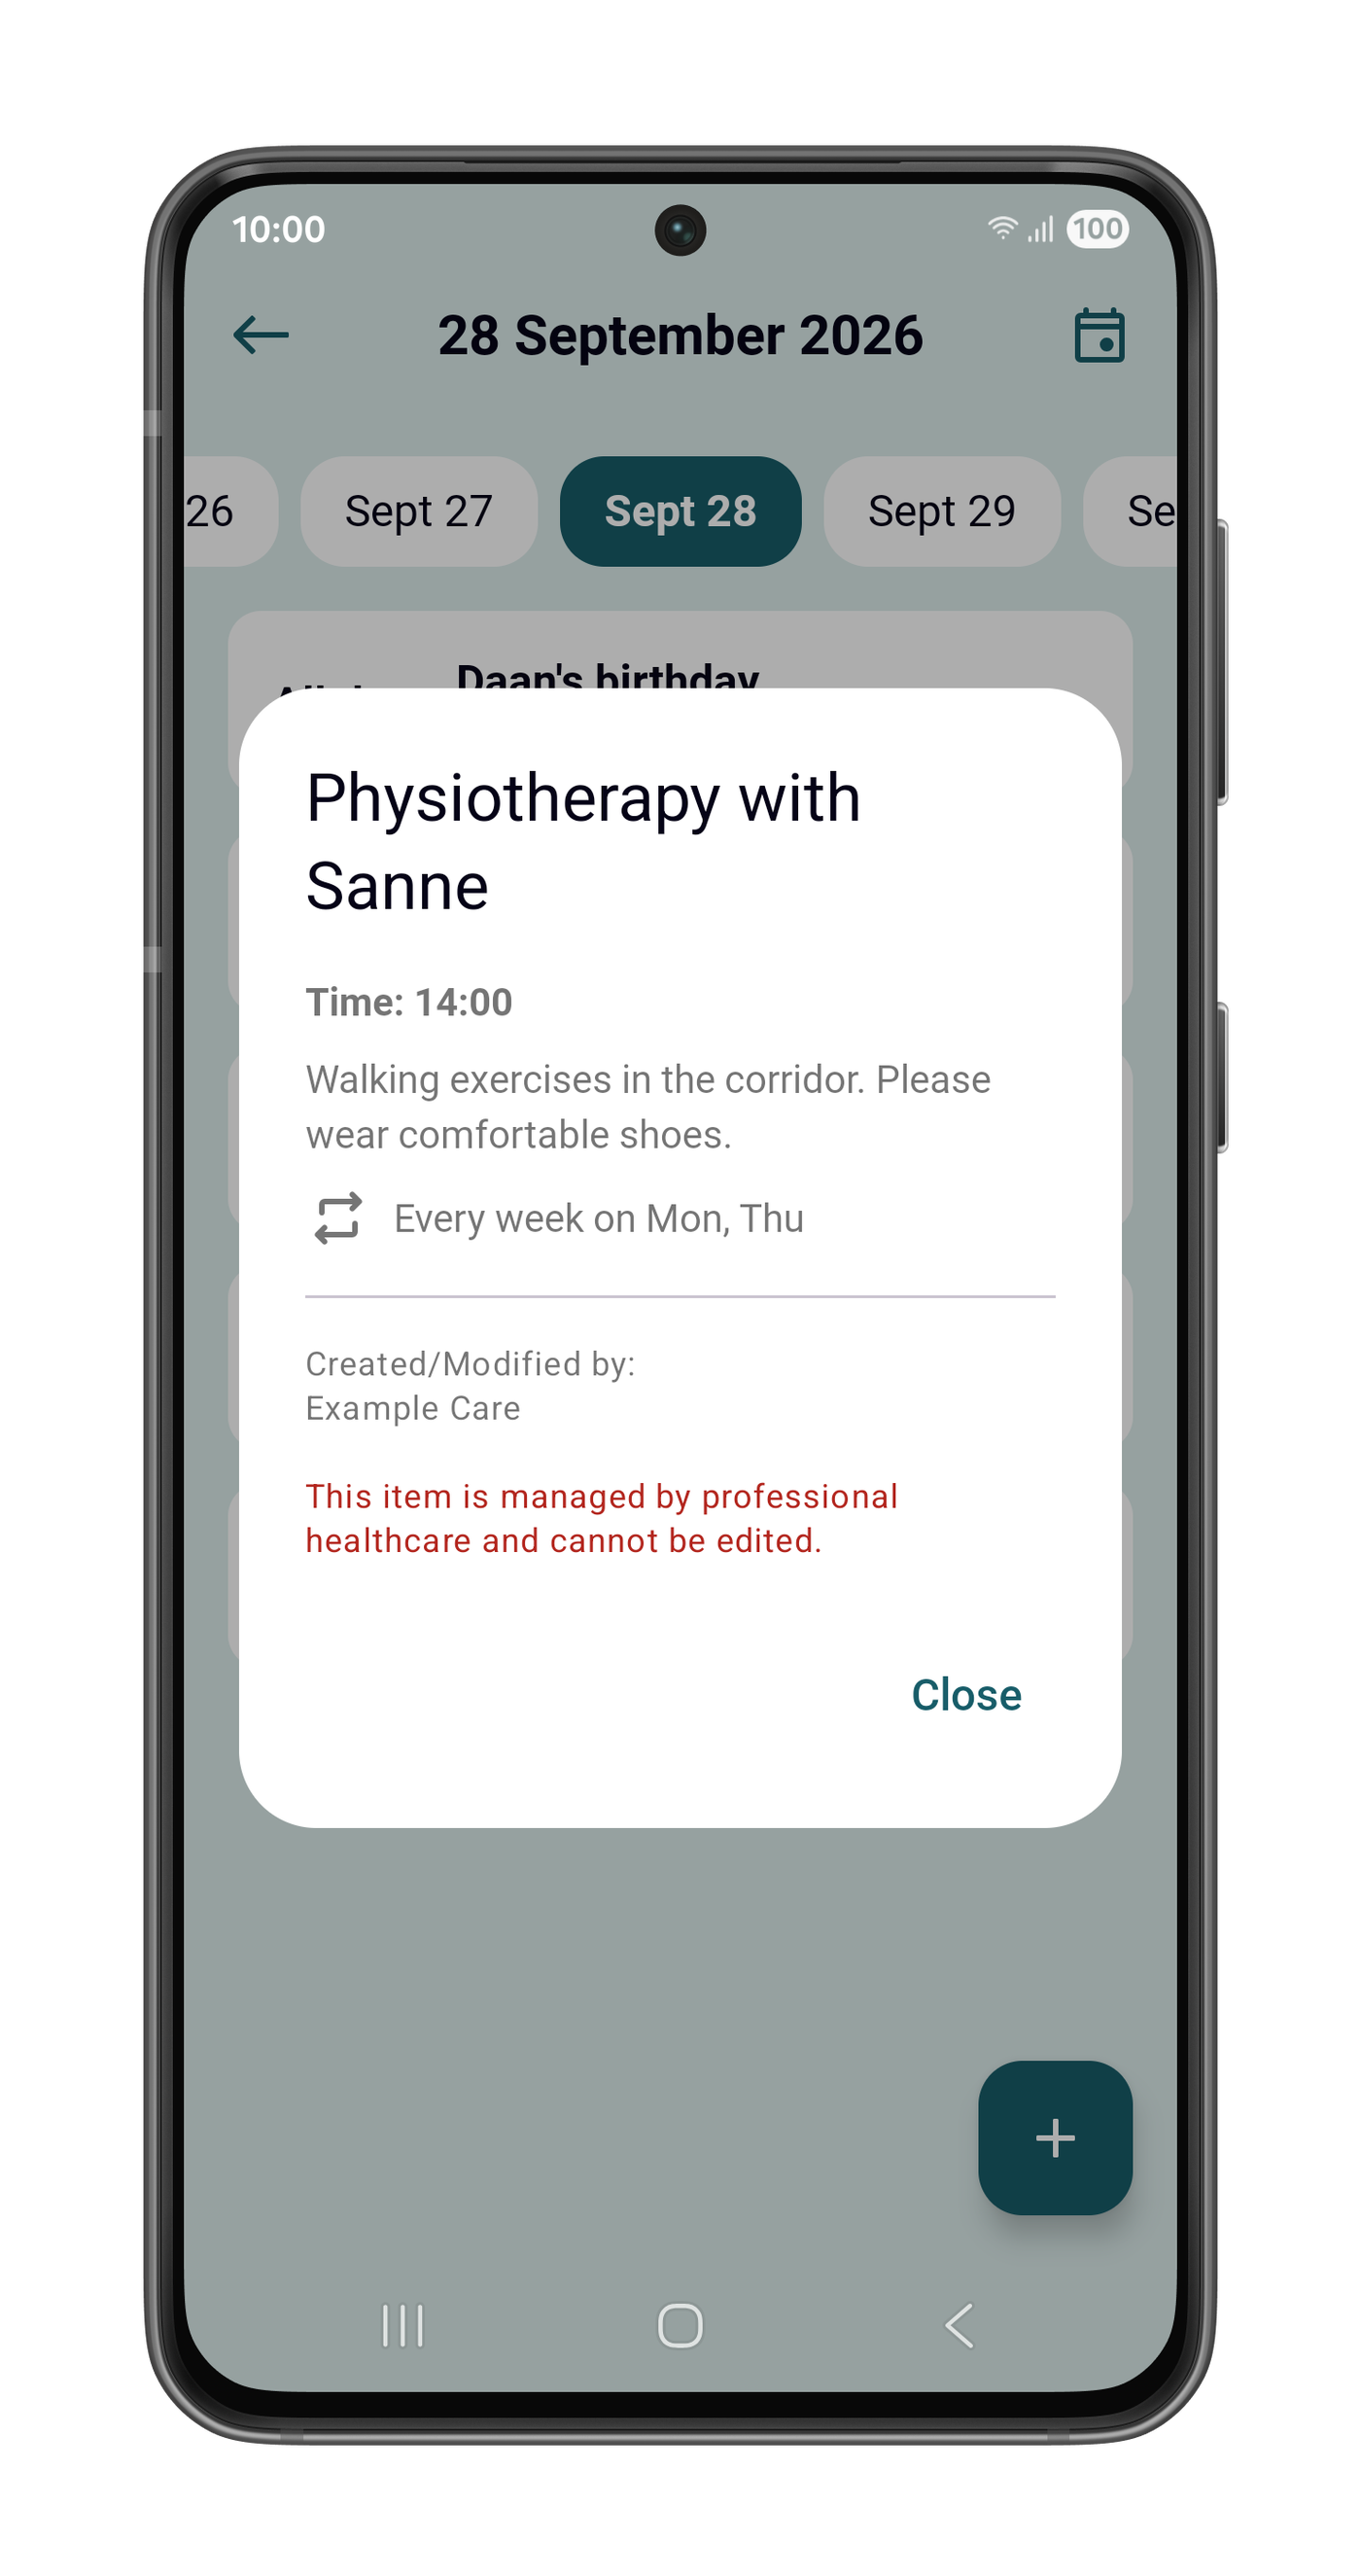
Tap any appointment to see its details: the time, the description, how it repeats, and who created or
last changed it.
Adding an appointment
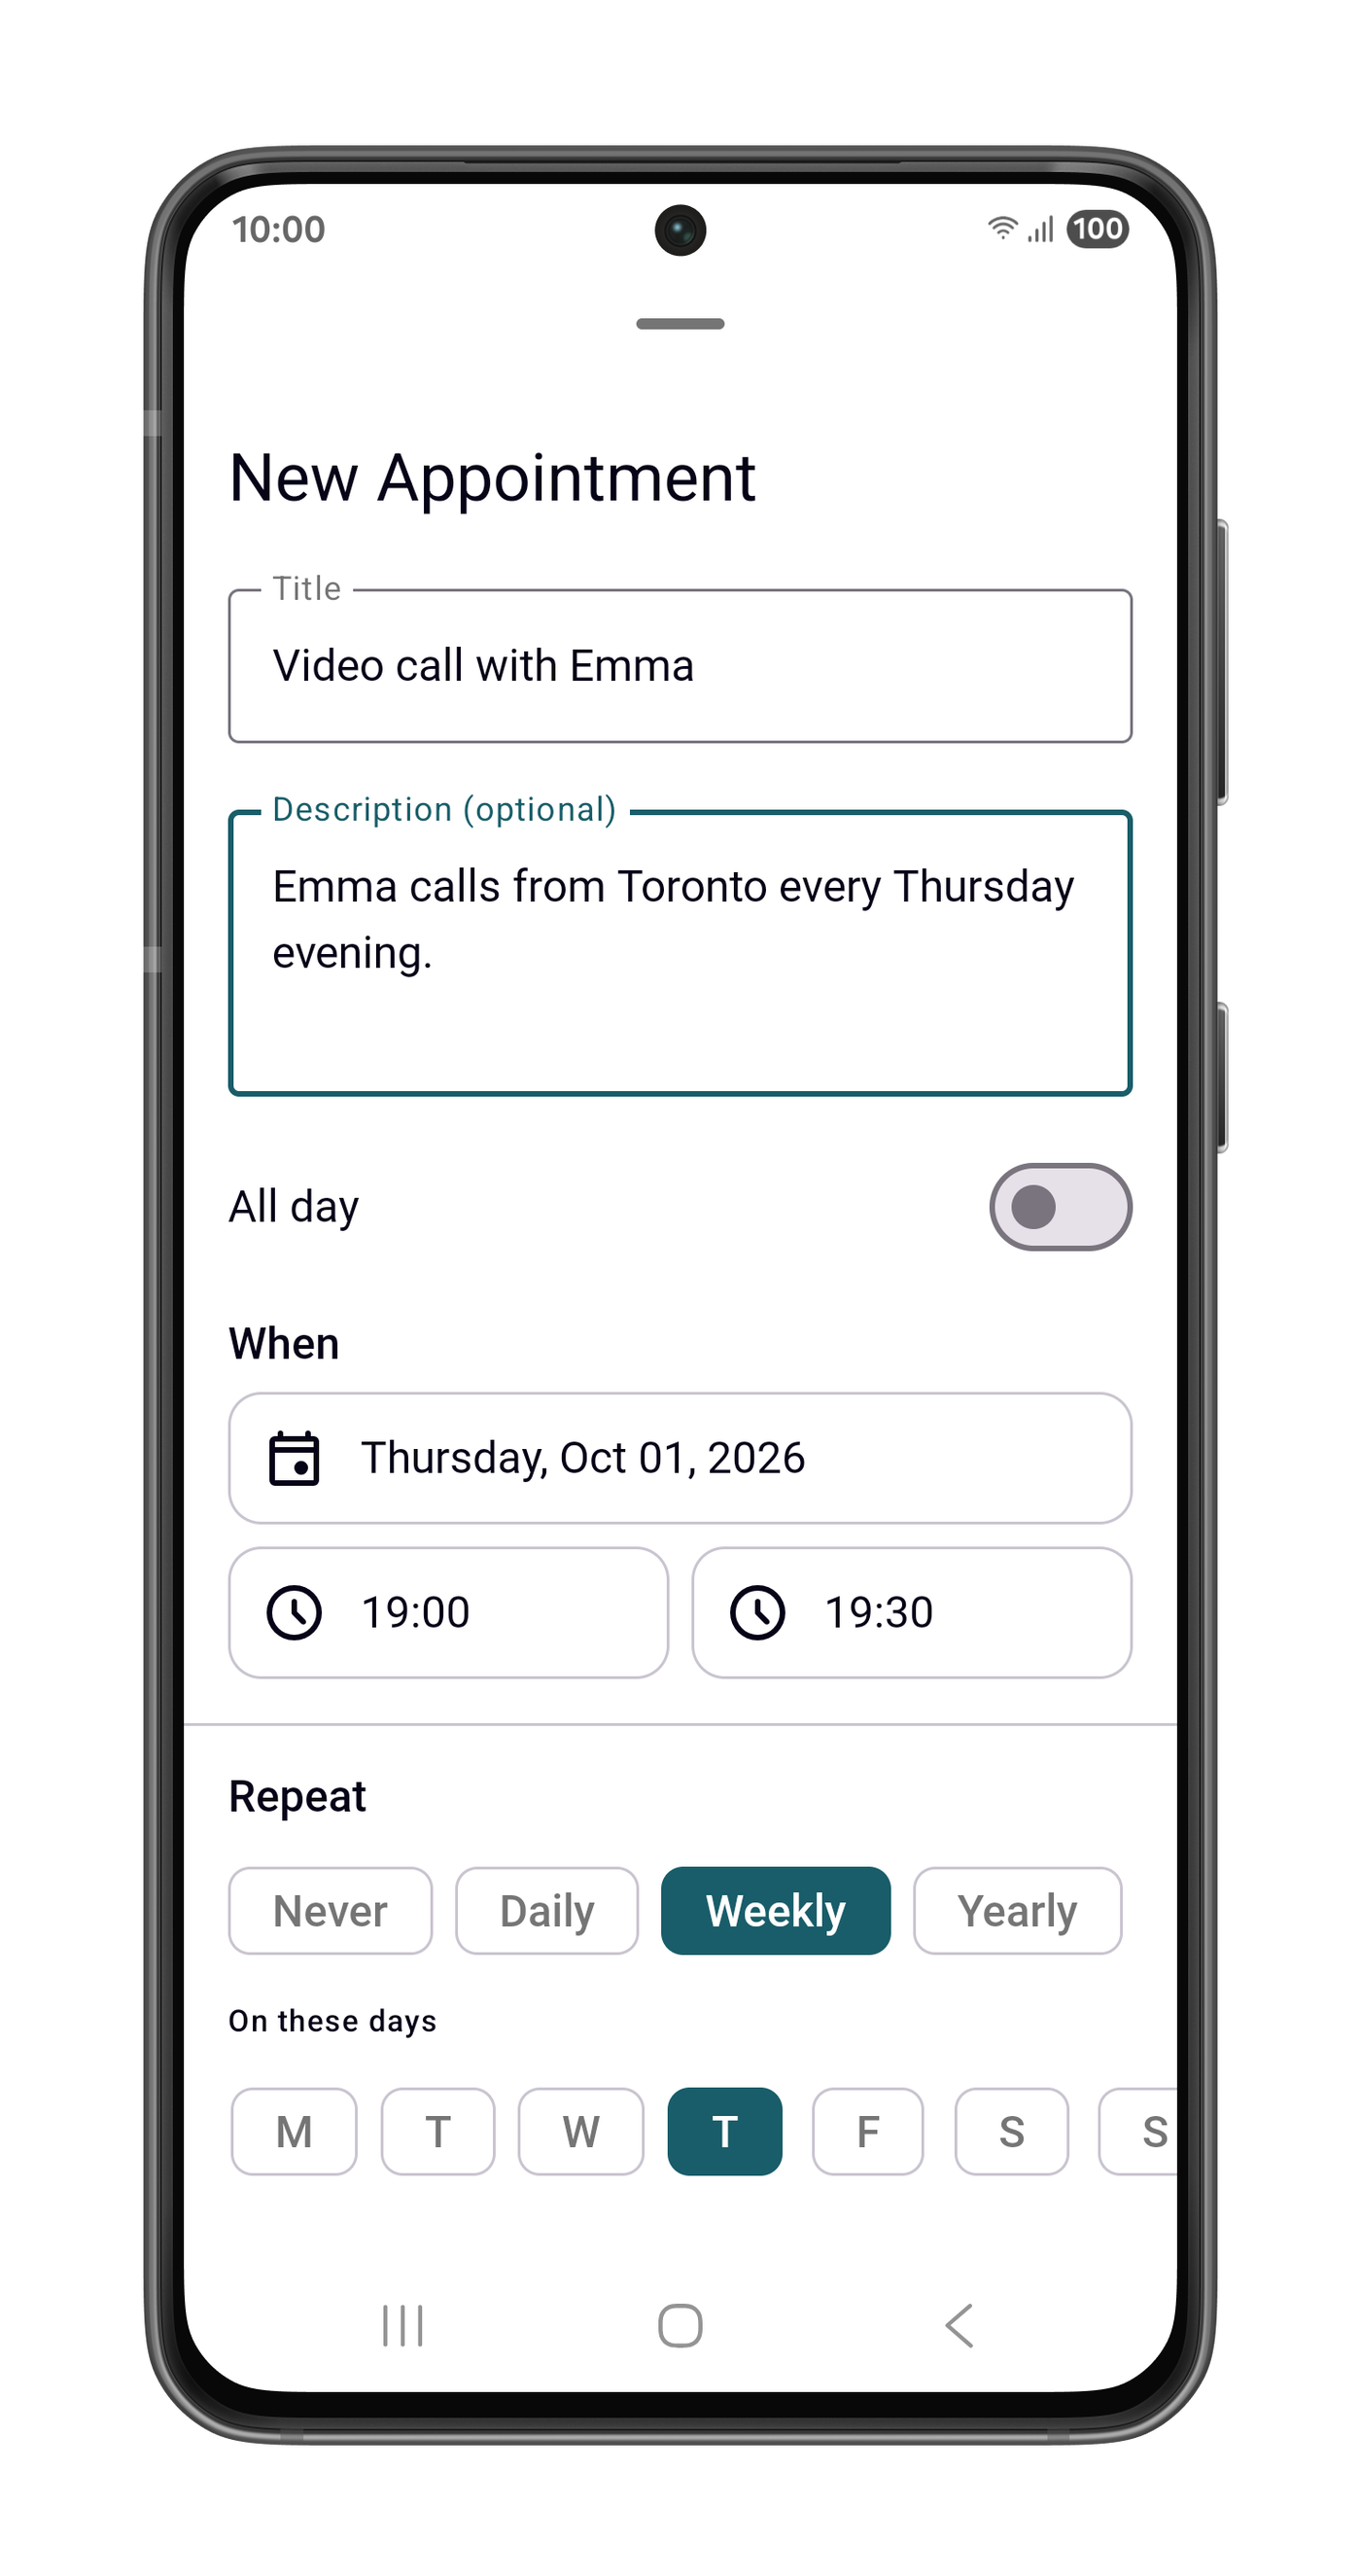
Tap + and give the appointment a title and, if you like, a description. Then choose the date and
the start and end time, or switch on All day. An appointment can repeat daily, weekly on the days
you choose, or yearly, which suits birthdays. It can repeat until a date you pick, or indefinitely.
The appointment then appears on the Genus, in the app of the other family members, and in the
Community Portal for the care team.
Good to know
- Any family member connected to the Genus can change or remove an appointment added by the family.
- Changes to a repeating appointment apply to every occurrence. Removing it removes the whole series.
- Times are always the local time of the Genus. An appointment at 15:30 is at 15:30 for your loved
one, even if you add it from another time zone.
For care professionals: the calendar in the Community Portal
Open a client and click the calendar icon in the header.
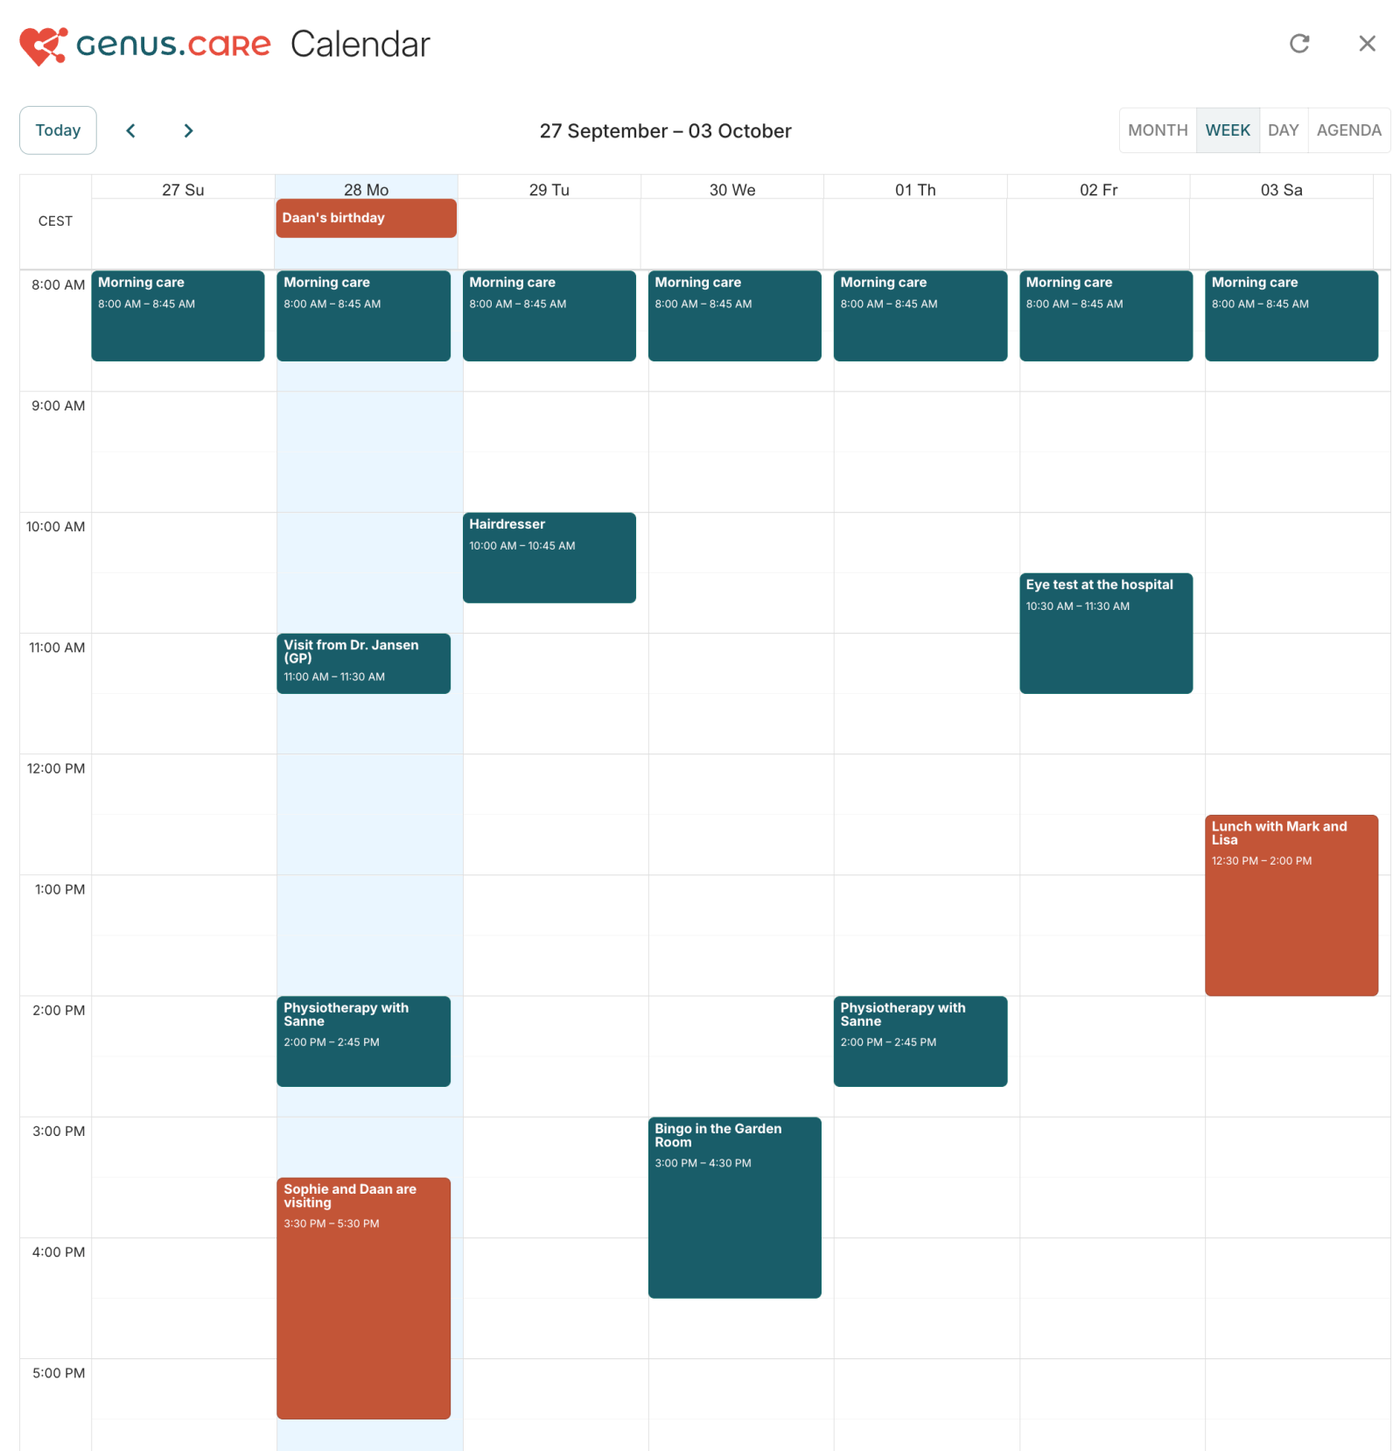
The client calendar has been rebuilt so that everything planned for a client appears in one view:
- your organisation's appointments,
- appointments family members add in the Genus app,
- appointments from a connected care system such as Nedap ONS,
- calendars the Genus is subscribed to.
ONS appointments now appear in every view, including the month view, where they could not be shown
before.
Colours show where an appointment comes from:
- Dark teal: Your care organisation
- Terracotta: Family, added from the Genus app
- Light blue: A connected care system or subscribed calendar
Appointment details
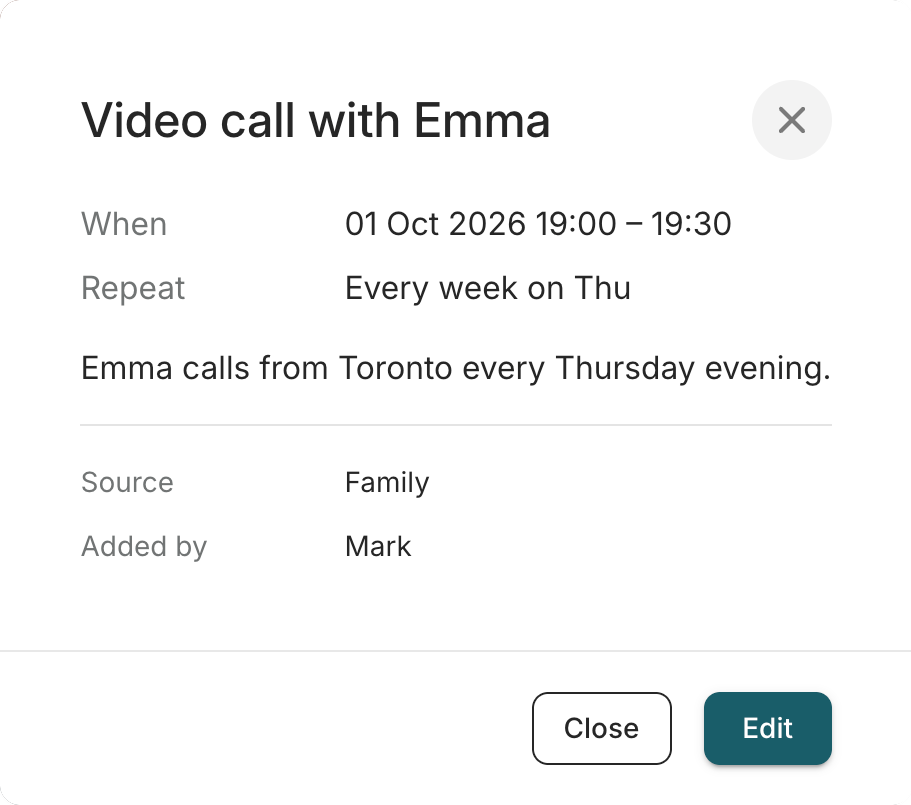
Clicking an appointment now opens its details first. They show:
- when the appointment takes place and how it repeats,
- the description,
- its source,
- who added it and who last changed it.
If you can't change an appointment, the dialog says why. For example, it is planned in ONS and can only be changed there, or another care team added it.
Family members see your organisation's name as the author of your team's appointments, never the name of an individual colleague.
Creating and editing
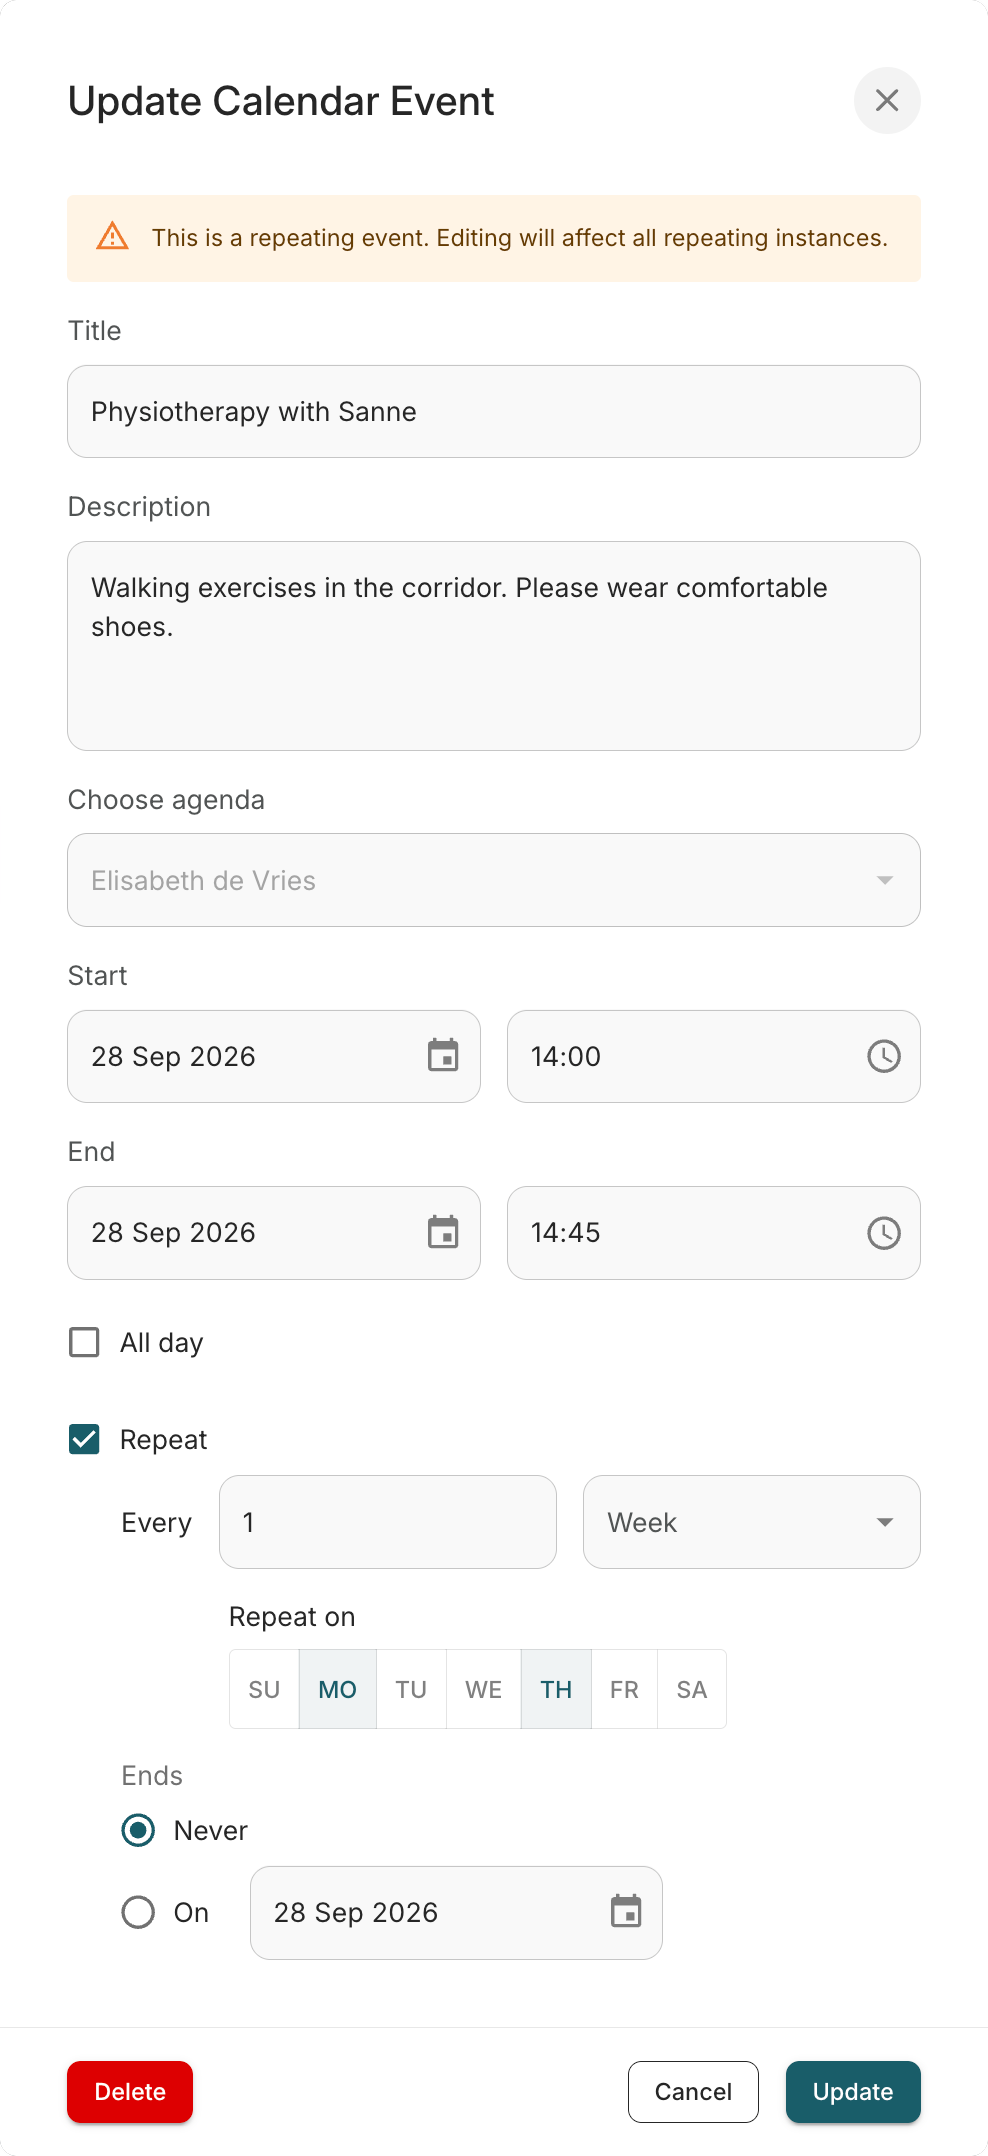
To add an appointment, click or drag across an empty slot. To change one, choose Edit in its
details.
Appointments can repeat every day, week or year at an interval you set. For weekly appointments you
choose the weekdays. A repeat can end on a date or continue indefinitely. You can also edit and remove appointments that family members added.
Good to know
- Repeating appointments. Changes always apply to the whole series. The dialog tells you this
before you save. Deleting a repeating appointment removes all of its occurrences.
- Monthly repeats. Monthly repetition is no longer available. Existing appointments with a pattern
the portal can't edit, such as a monthly repeat, stay visible and are marked read-only.
- All-day appointments always cover a single day.
- Dragging. One-off appointments can be dragged to another time or resized. Dragging one into the
all-day row turns it into an all-day appointment, and dragging it back turns it into a timed one
again.
- Time zones. Times are always the local time of the client's Genus. If your computer is set to a
different time zone, the dialog tells you.
New setting: keep appointment details private
Some appointments belong to the client and the care team, such as a hospital visit or a treatment.
The client may want the help without a conversation about it. A new setting lets your organisation
keep the details of its appointments private. Family members still see that something is planned and
when.
You'll find it under Community settings → Default Genus configuration → Hide calendar event details for family members (privacy). It is off by default, and a health administrator can switch it on.

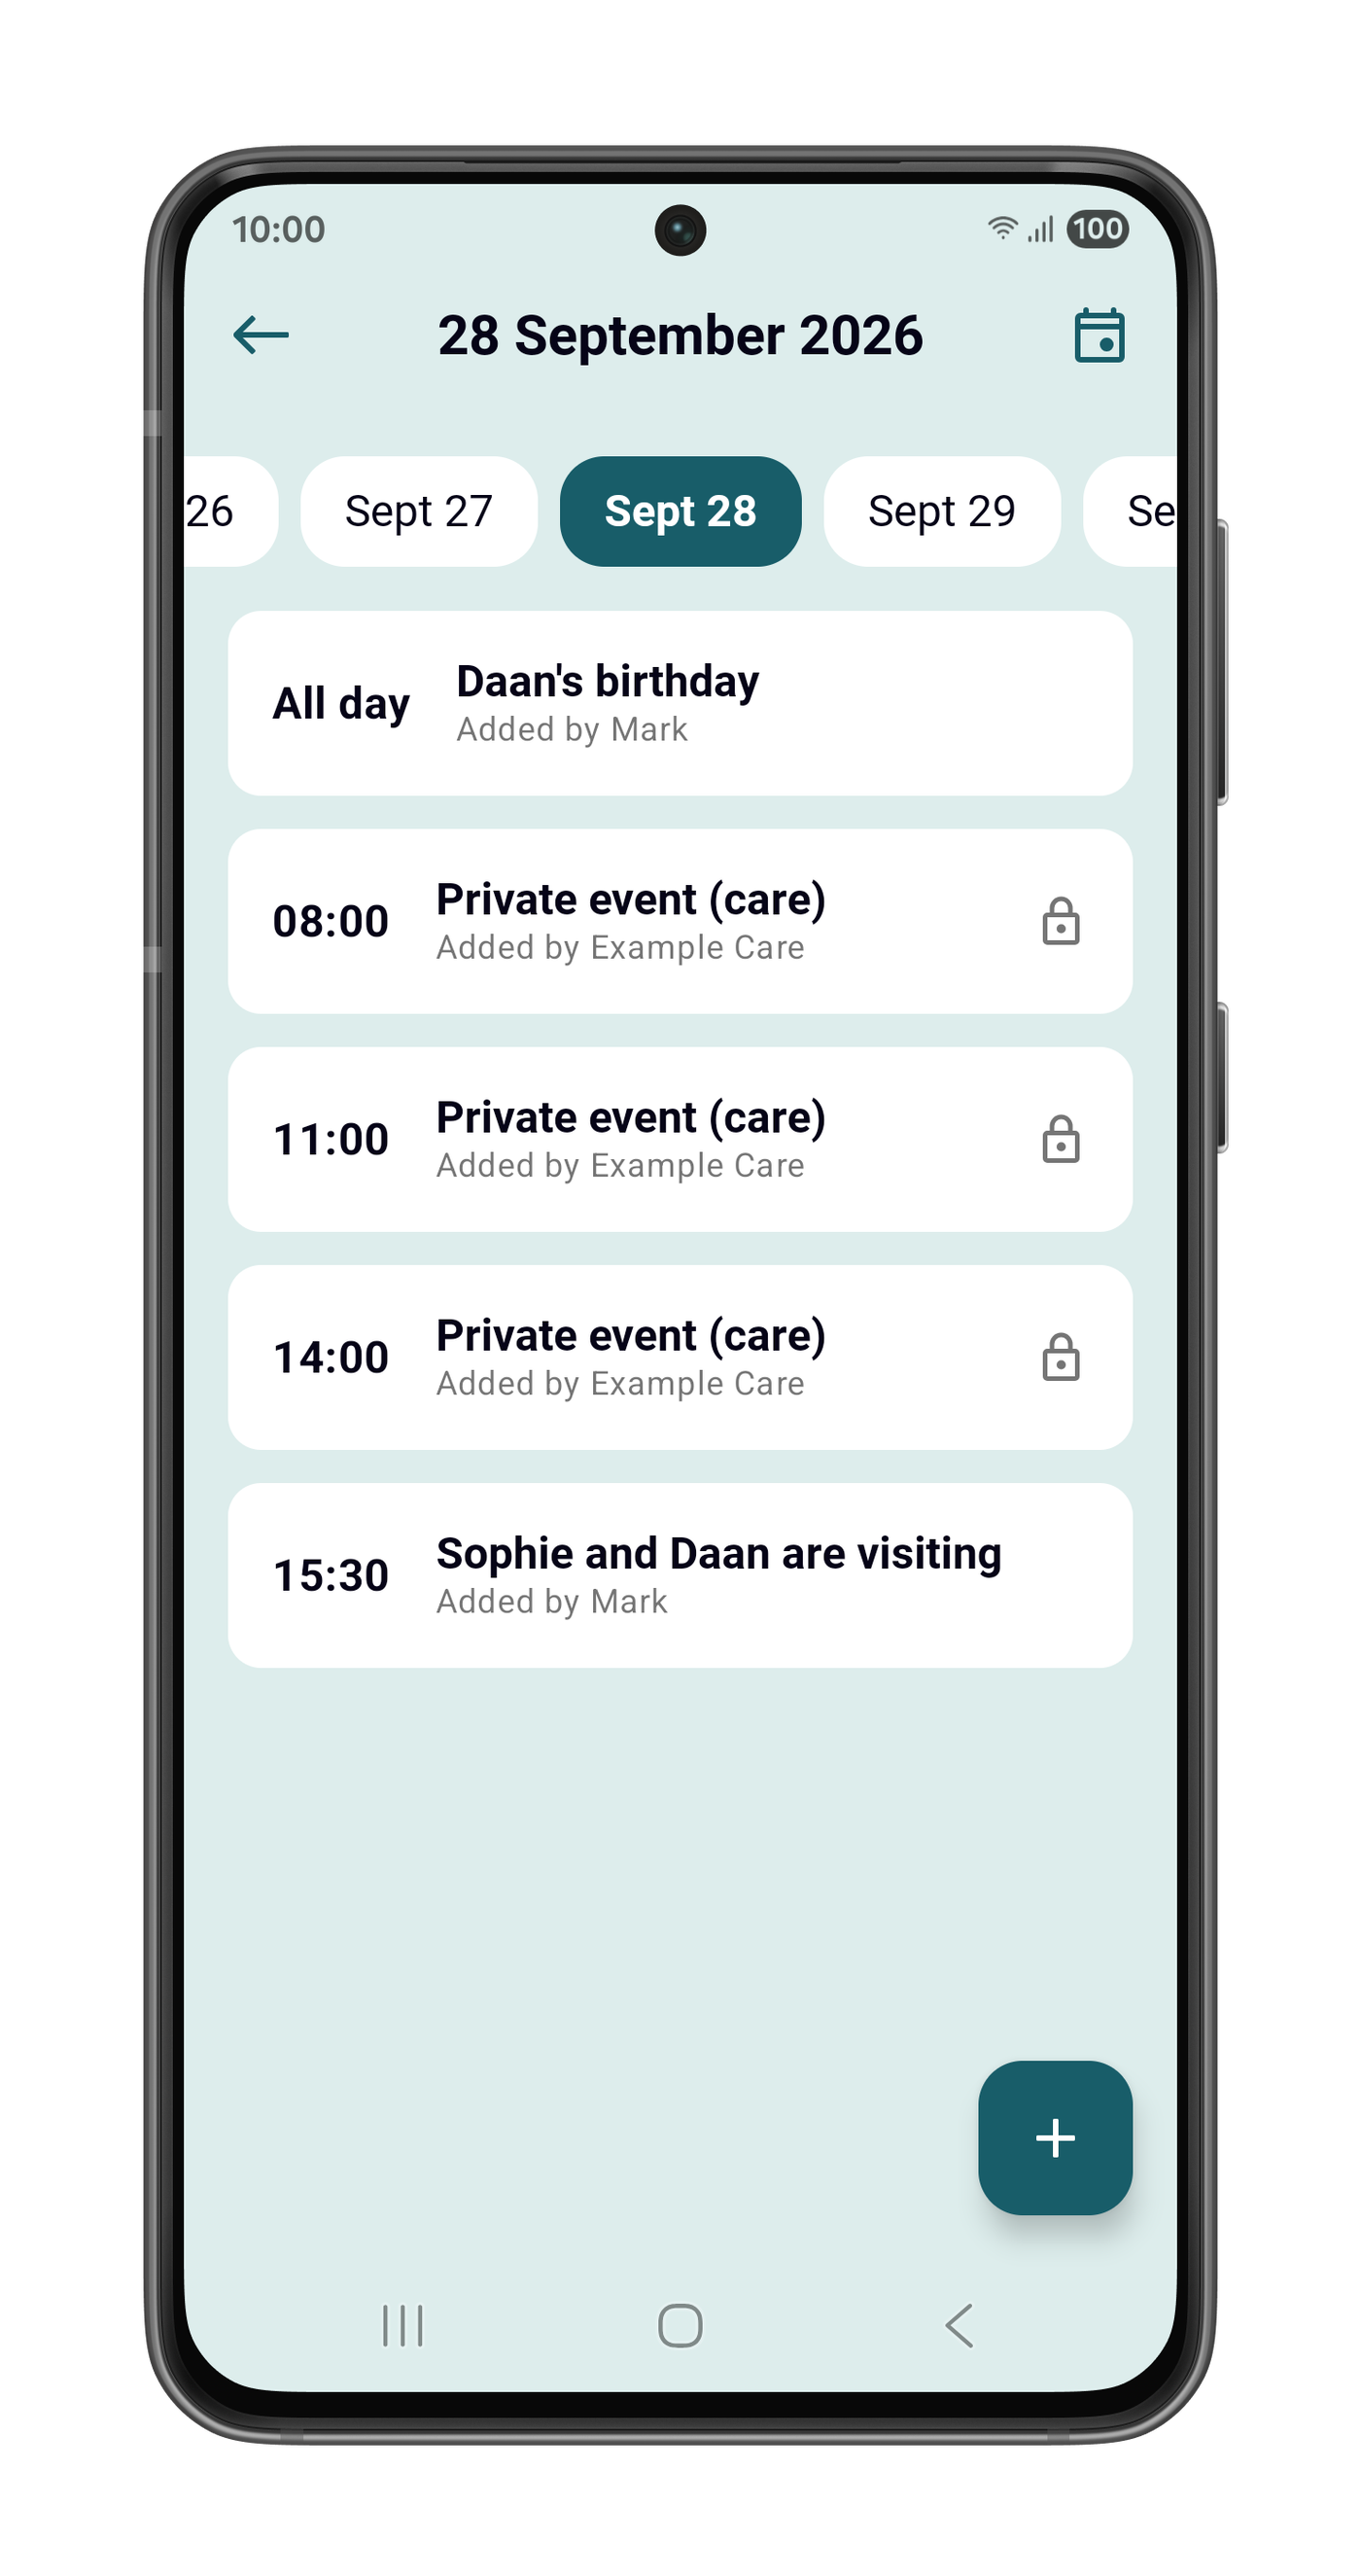
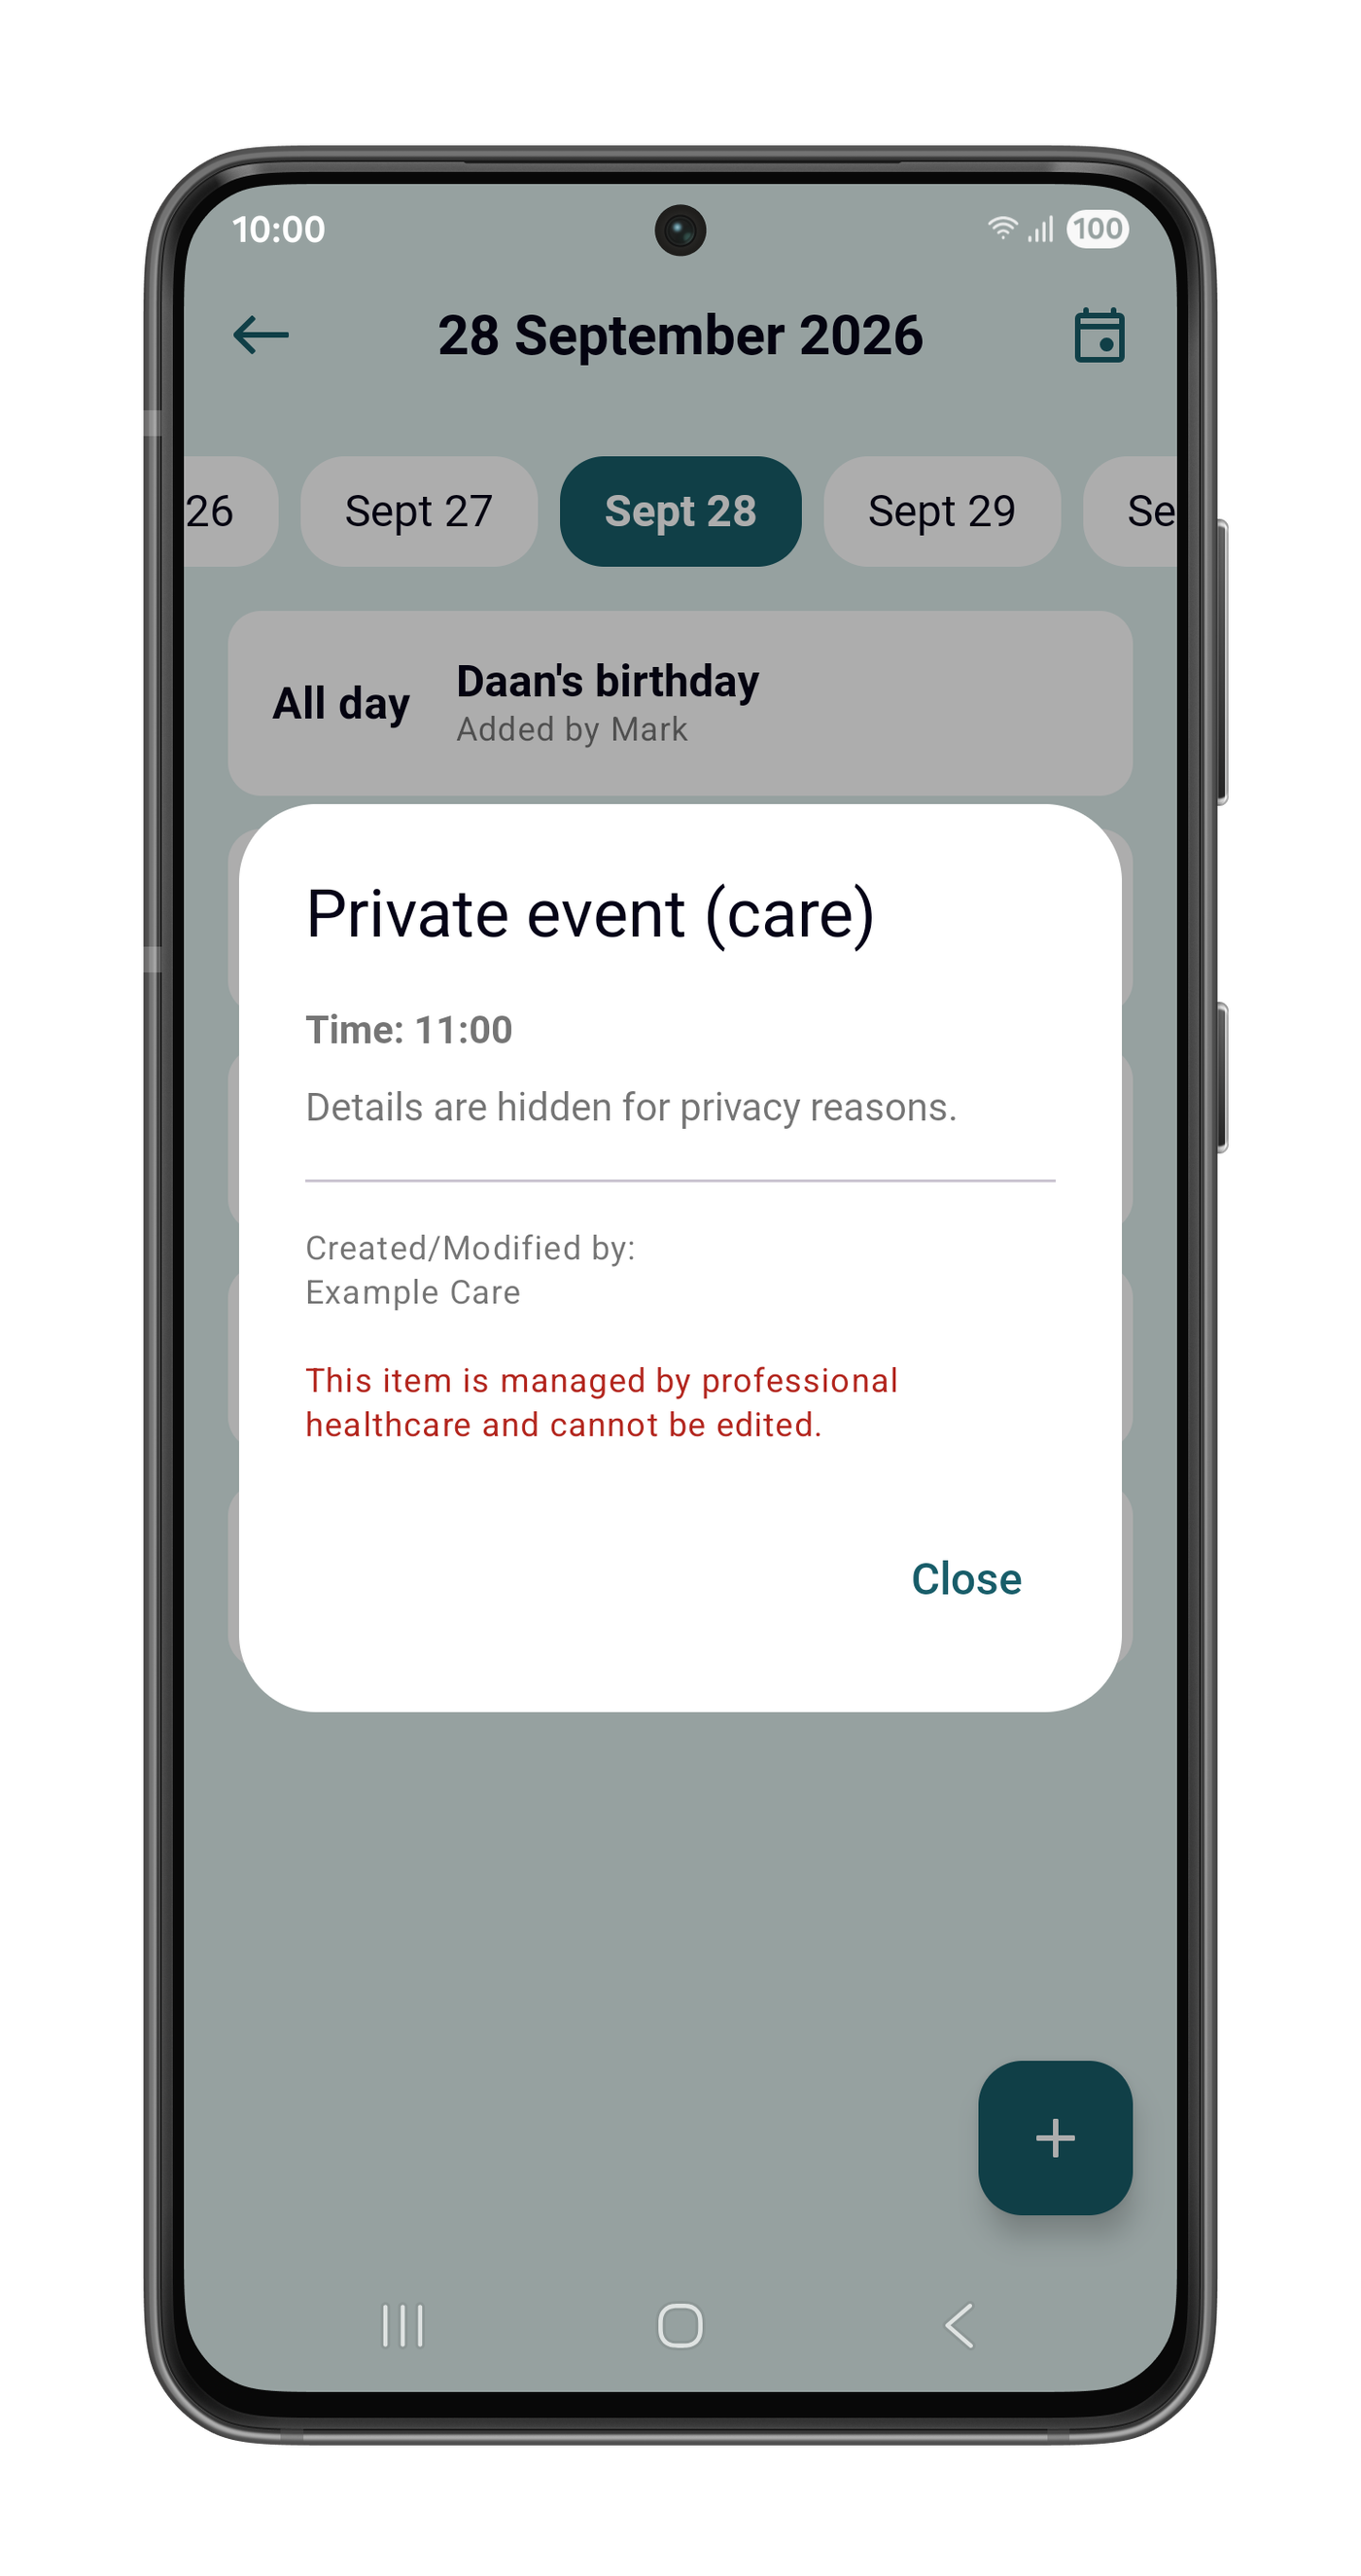
When the setting is on, family members see your organisation's appointments in the Genus app with
their time, but without their title or description. Each one appears as Private event (care), and its details read Details are hidden for privacy reasons. Appointments that family members add
themselves stay fully visible.
Good to know
- What it covers. The setting applies to the appointments your organisation adds, including those
from your ONS connection.
- What it doesn't cover. It doesn't hide appointments added by family or calendars the Genus is
subscribed to.
- Older appointments. Appointments created before this update don't record which organisation
added them, so the setting doesn't hide them.
- The client and your team still see everything. The client sees full details on the Genus, and
your team sees them in the Community Portal.
- More than one care organisation. If a client is connected to several organisations, each
organisation's setting applies to its own appointments.
On the Genus: browse the days ahead
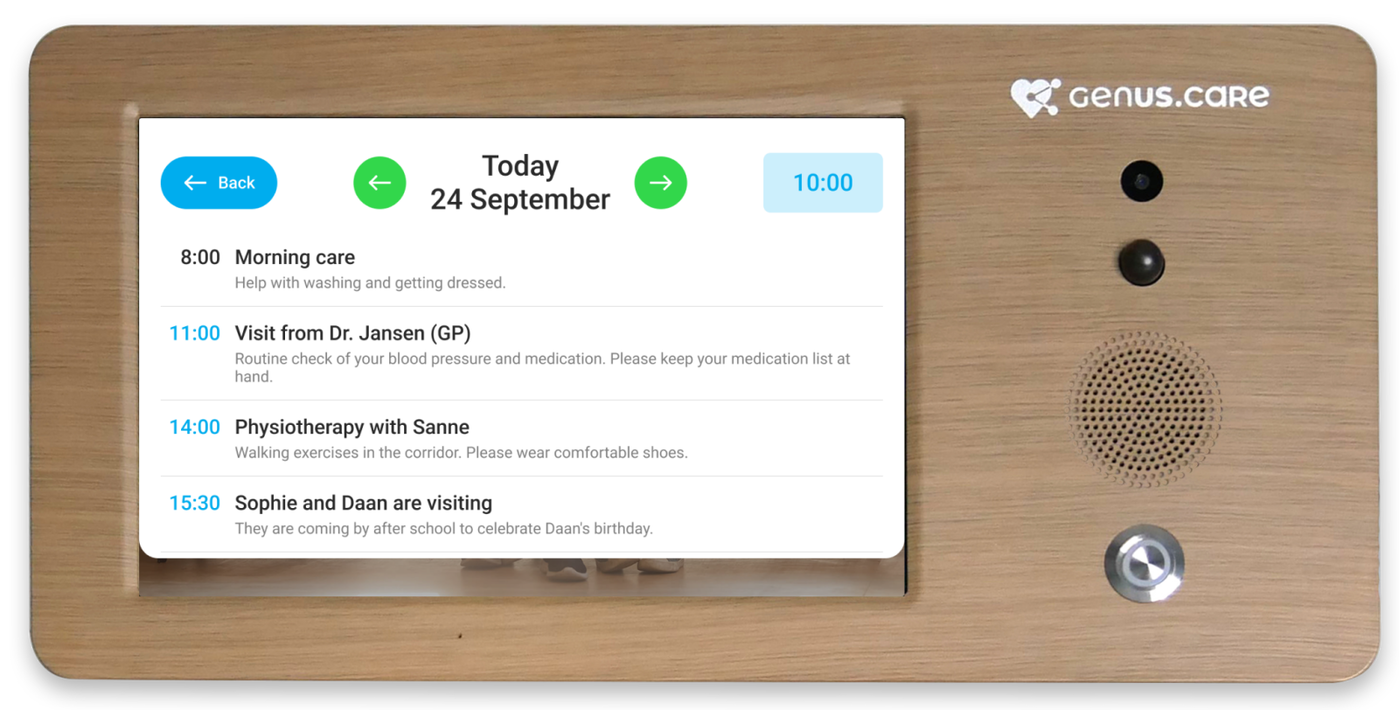
My Day on the Genus now shows more than today. Two green arrows beside the date move to the previous or next day. The header names the day: Today, Tomorrow, or the weekday with the date.
- Details. Tap an appointment to read its full description and see who added it.
- All-day appointments are listed first, marked all day. In the Day Overview on the home screen
they have their own All day section.
- Empty days show Nothing planned. If the agenda can't be loaded, the Genus says so rather than
showing an empty day.
The client always sees the full details of every appointment, even when the privacy setting above is
switched on.
Fixes and improvements
- Repeating appointments no longer lose occurrences when several days are shown at once.
- All-day appointments no longer move to the previous or next day in some time zones.
- Weekly appointments now start on the first selected weekday on or after the chosen start date.
- Simultaneous changes: Two changes saved at the same moment can no longer silently overwrite each other. If a change can't be saved, you see an error instead.
- Descriptions from connected care systems and subscribed calendars are shown as readable text
instead of raw formatting code.
Availability
The calendar is available on the Genus. It is not part of Genus Lite.
- The Community Portal and the Genus receive the update automatically.
- Family members get the calendar by updating the Genus app from the App Store or Google Play.